
Step-by-step process to integrate your WooCommerce store with Serri
Want to connect your WooCommerce store with Serri to automate useful notifications like Order confirmation, Abandoned Cart Reminders, Delivery updates, Payment reminders & more?
You're at the right place!
However, to connect your WooCommerce store with Serri , you first need to generate secret API keys from WooCommerce. Refer this doc to create your API keys👇
How to generate the Secret API Keys from your WooCommerce store
Done? Let's help you connect your WooCommerce store with Serri .
How to integrate WooCommerce store with Serri ?
1. In Serri Dashboard, go to Ecomm+
To connect your WooCommerce store with Serri , go to the all-new Ecomm+ & click Store Set up.

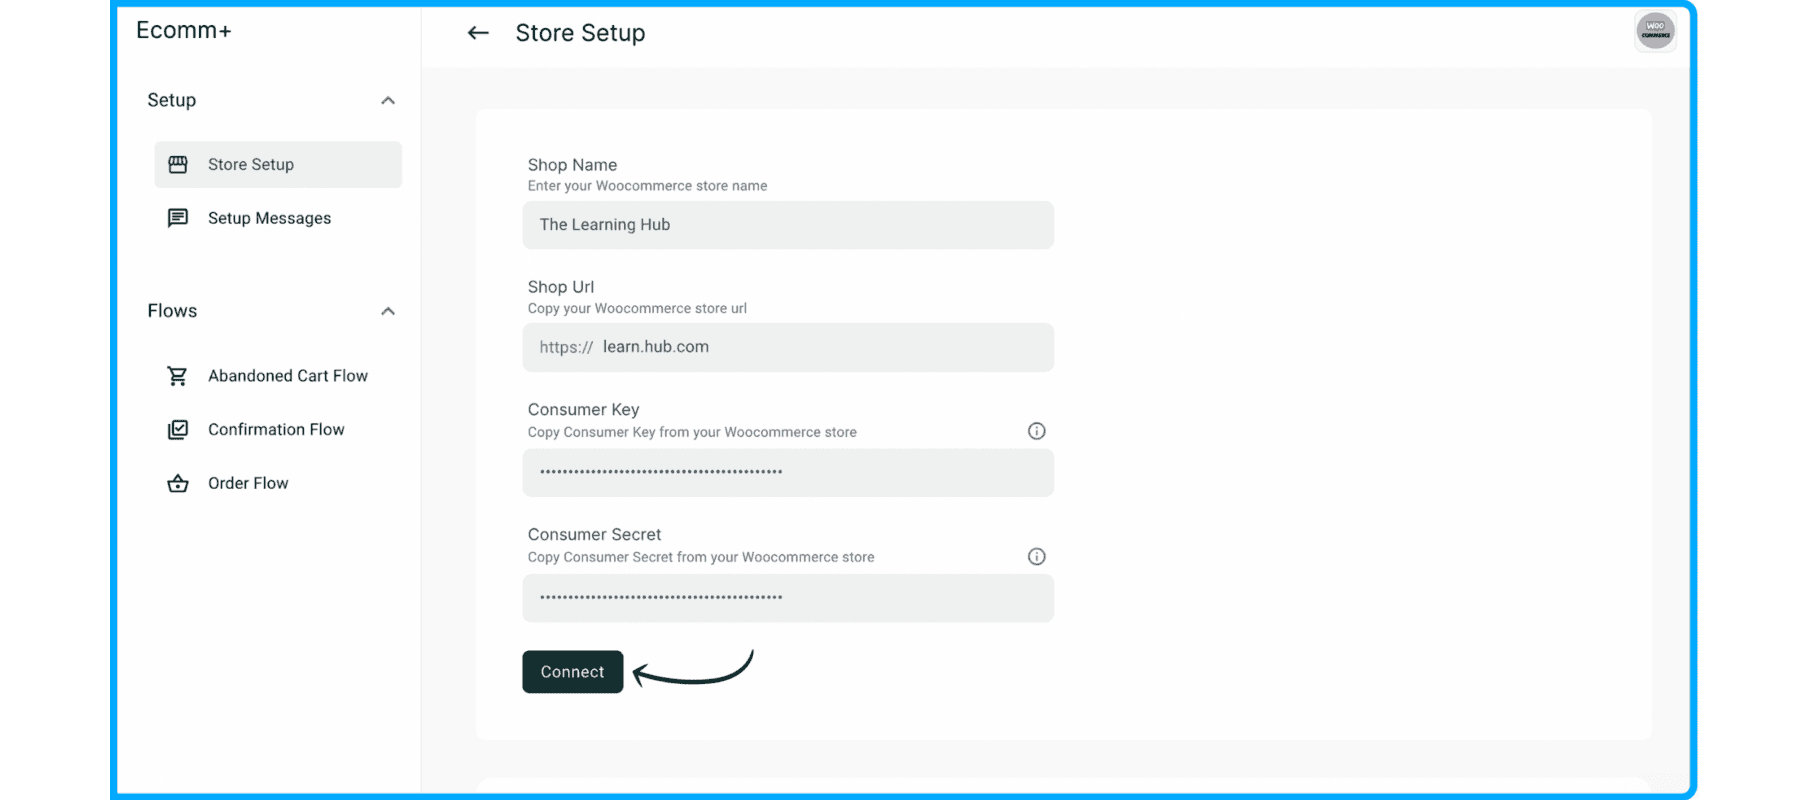
2. Enter credentials of your WooCommerce Store
Next, copy-paste your WooCommerce Shop Name, Shop URL, Consumer Key & Consumer Secret Key generated through WooCommerce & click Connect.
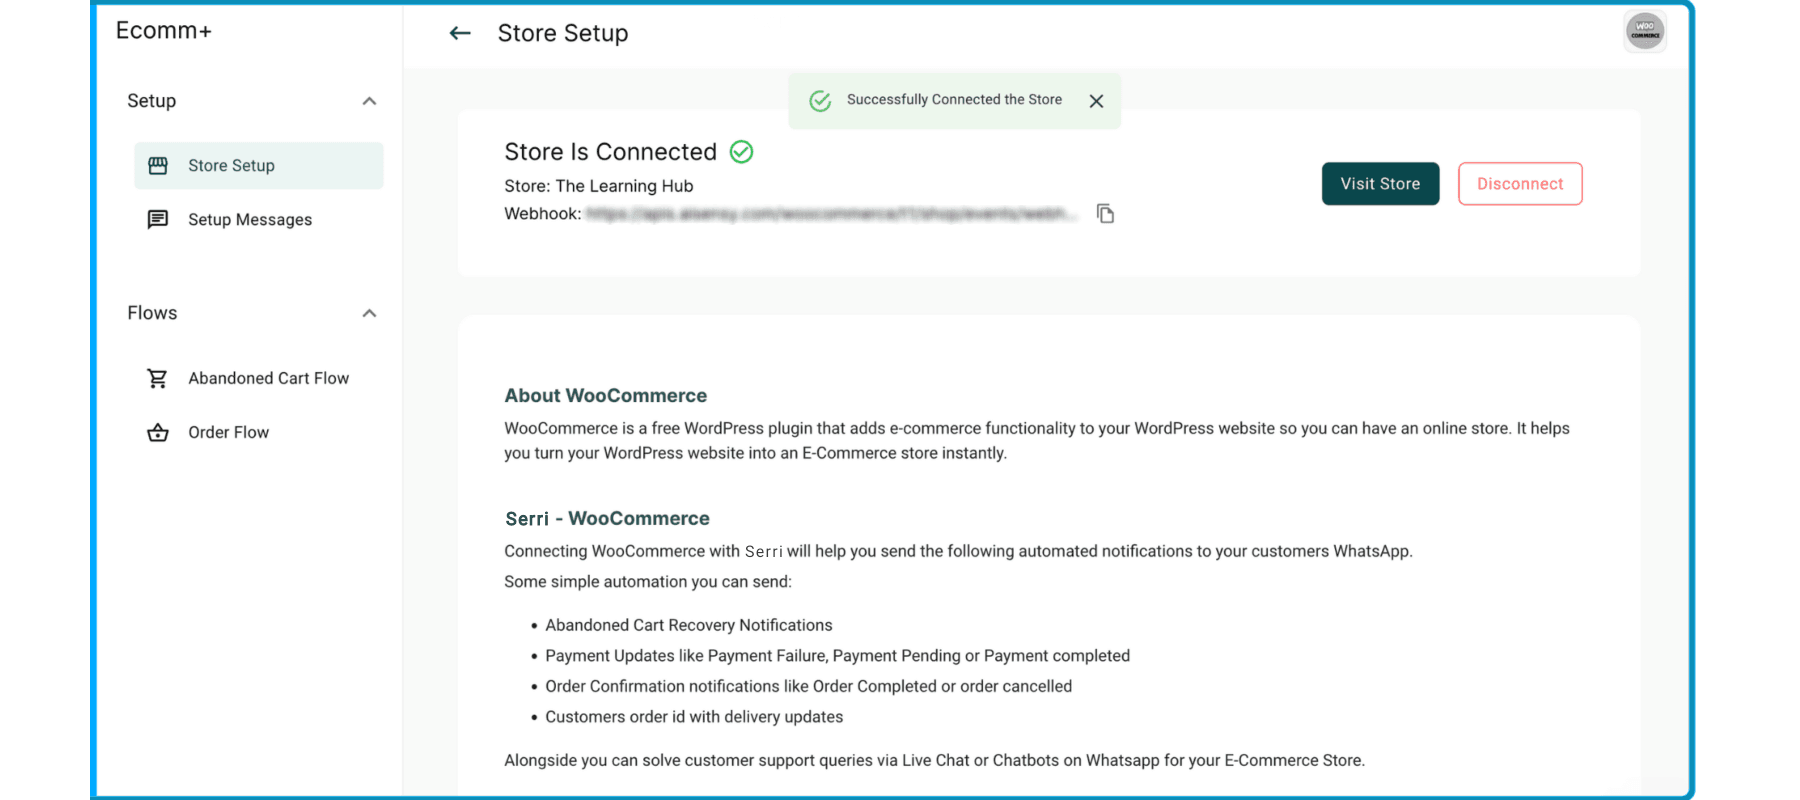
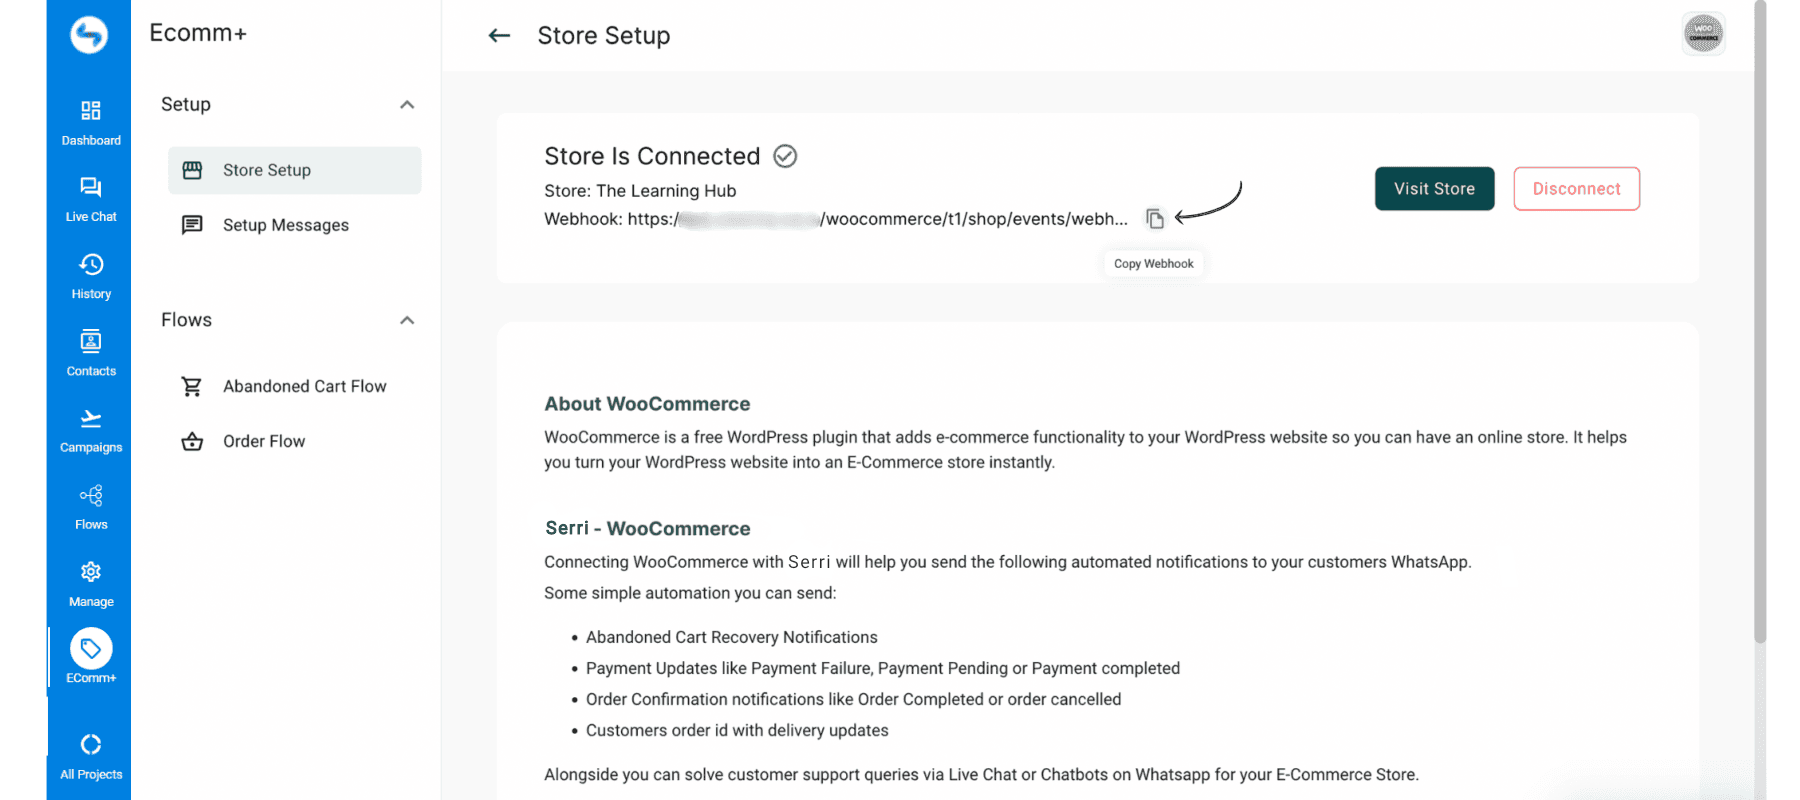
3. WooCommerce store is successfully connected
If the details you entered are correct, you'll see the WooCommerce store status as Connected
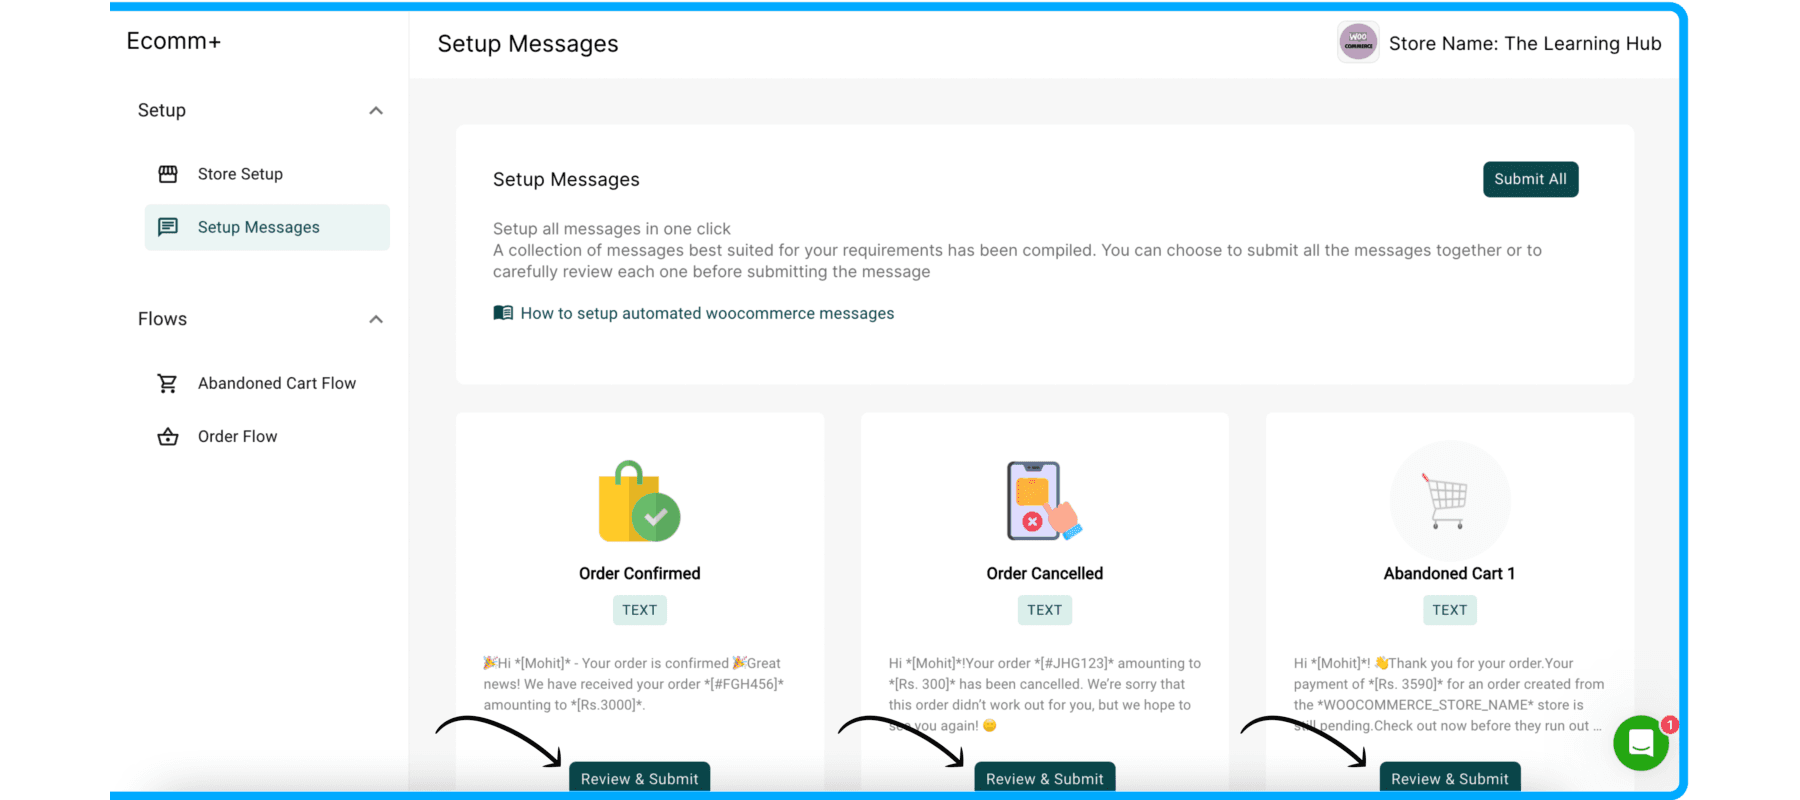
4. Setup messages for your WooCommerce store
Next, after clicking Connect, you'll redirect to the Set up messages section where you need to approve WhatsApp template messages to automate from your WooCommerce store on WhatsApp.
Relax, we got you covered! We've placed 5 super useful Ecommerce Templates covering use cases including Abandoned Cart Reminders, Order Confirmation, Order Cancelled and many more messages.
Review the messages that meet your business needs & submit them for approval.
If you wish to edit your templates, click the Review & Submit button.
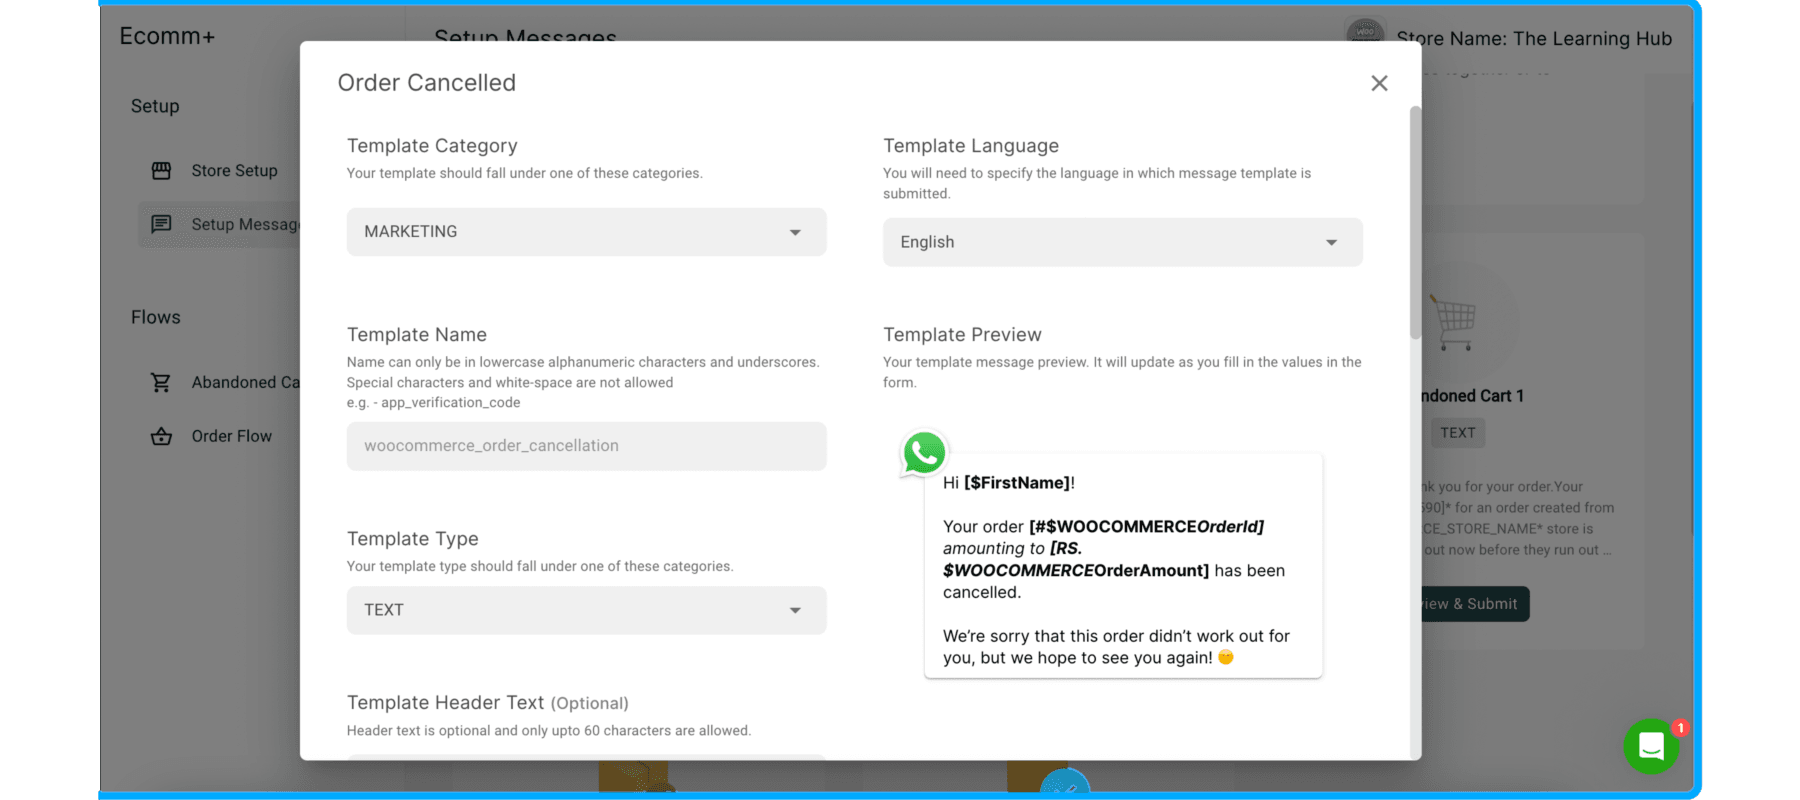
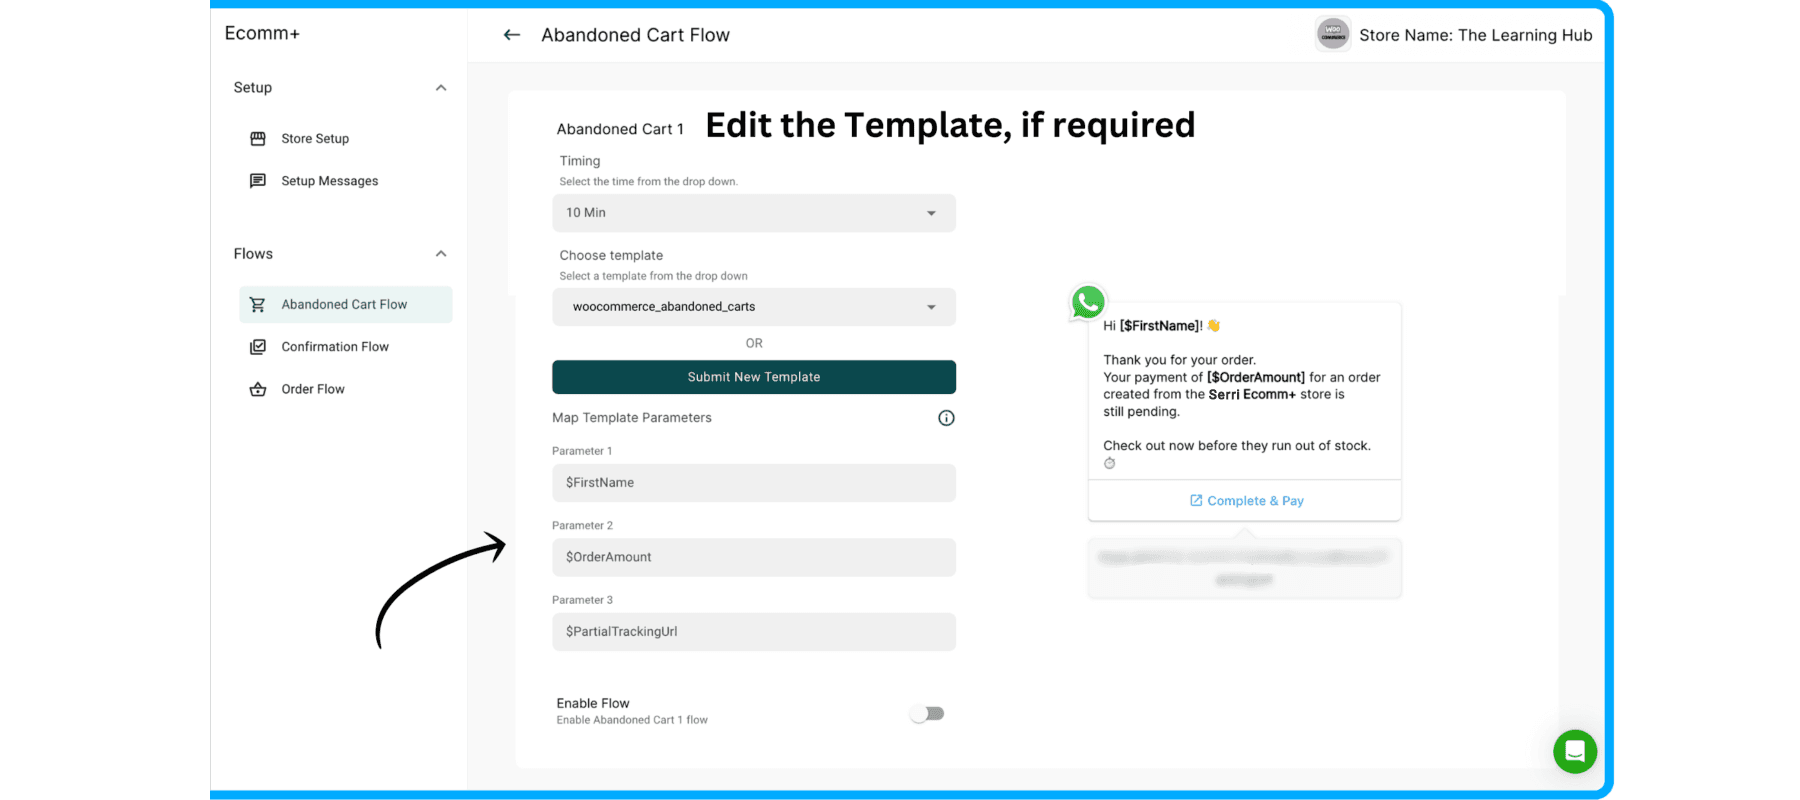
5. Edit the Template messages, if required
Clicking Review & Submit will open the Template edit field where you can customize the message as per your requirements.
You can edit the Template Category, name, type, language, format & CTA/ Quick replies.
Note: If you edit the template, make sure to Submit the template message for approval.
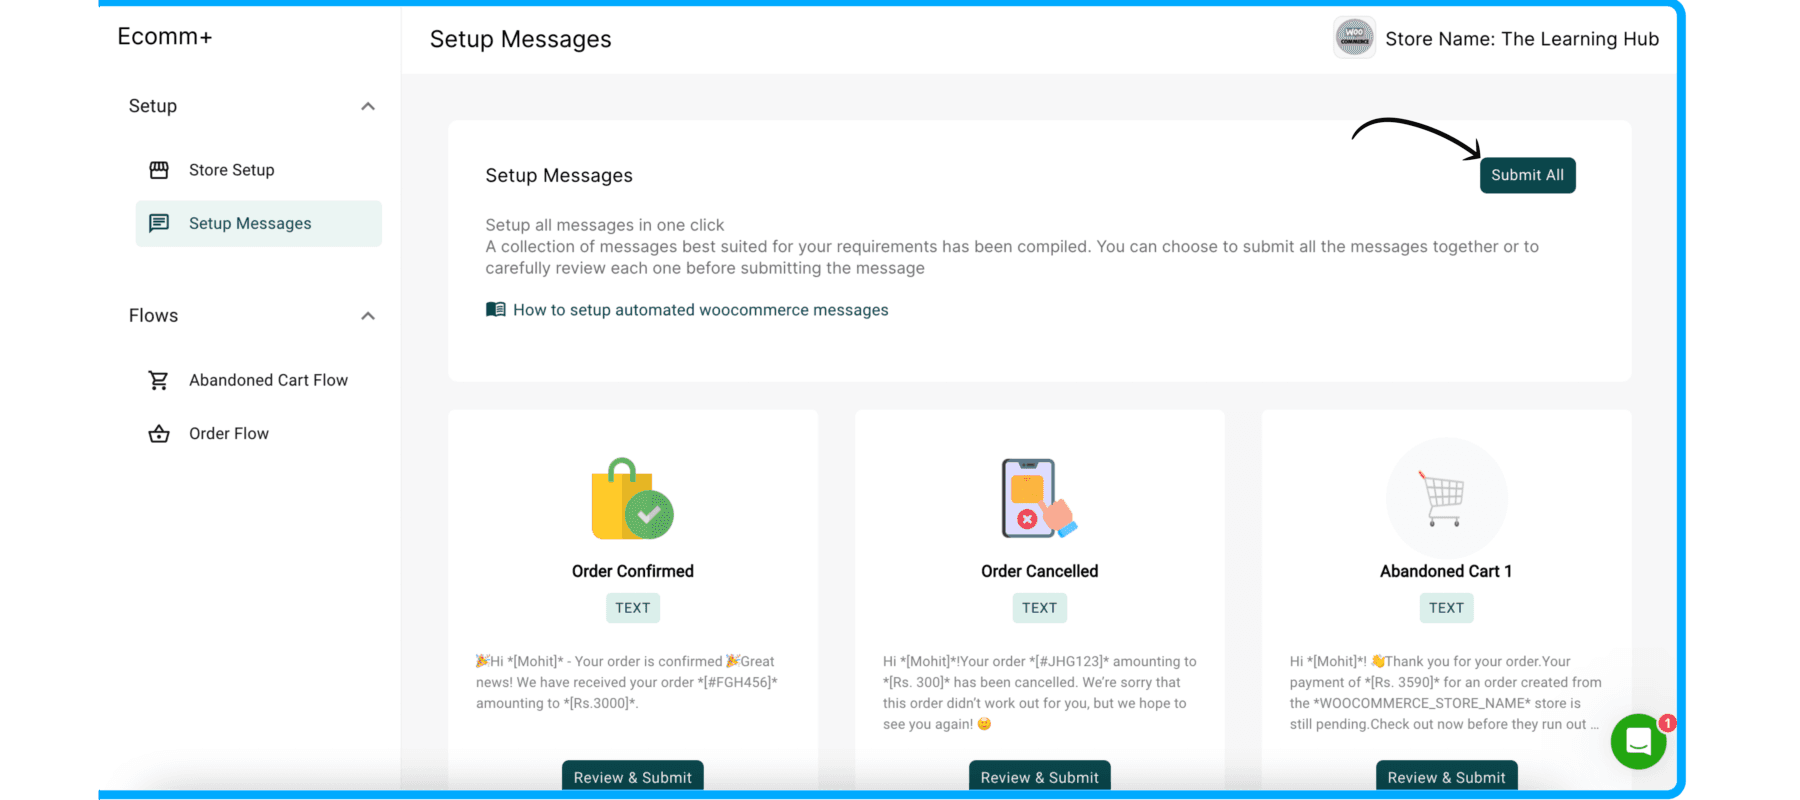
6. Submit the messages
After final edits, click the Submit all button to submit the template messages for approval.
Note: If you don't want to approve all template messages, manually review & submit the required template messages.
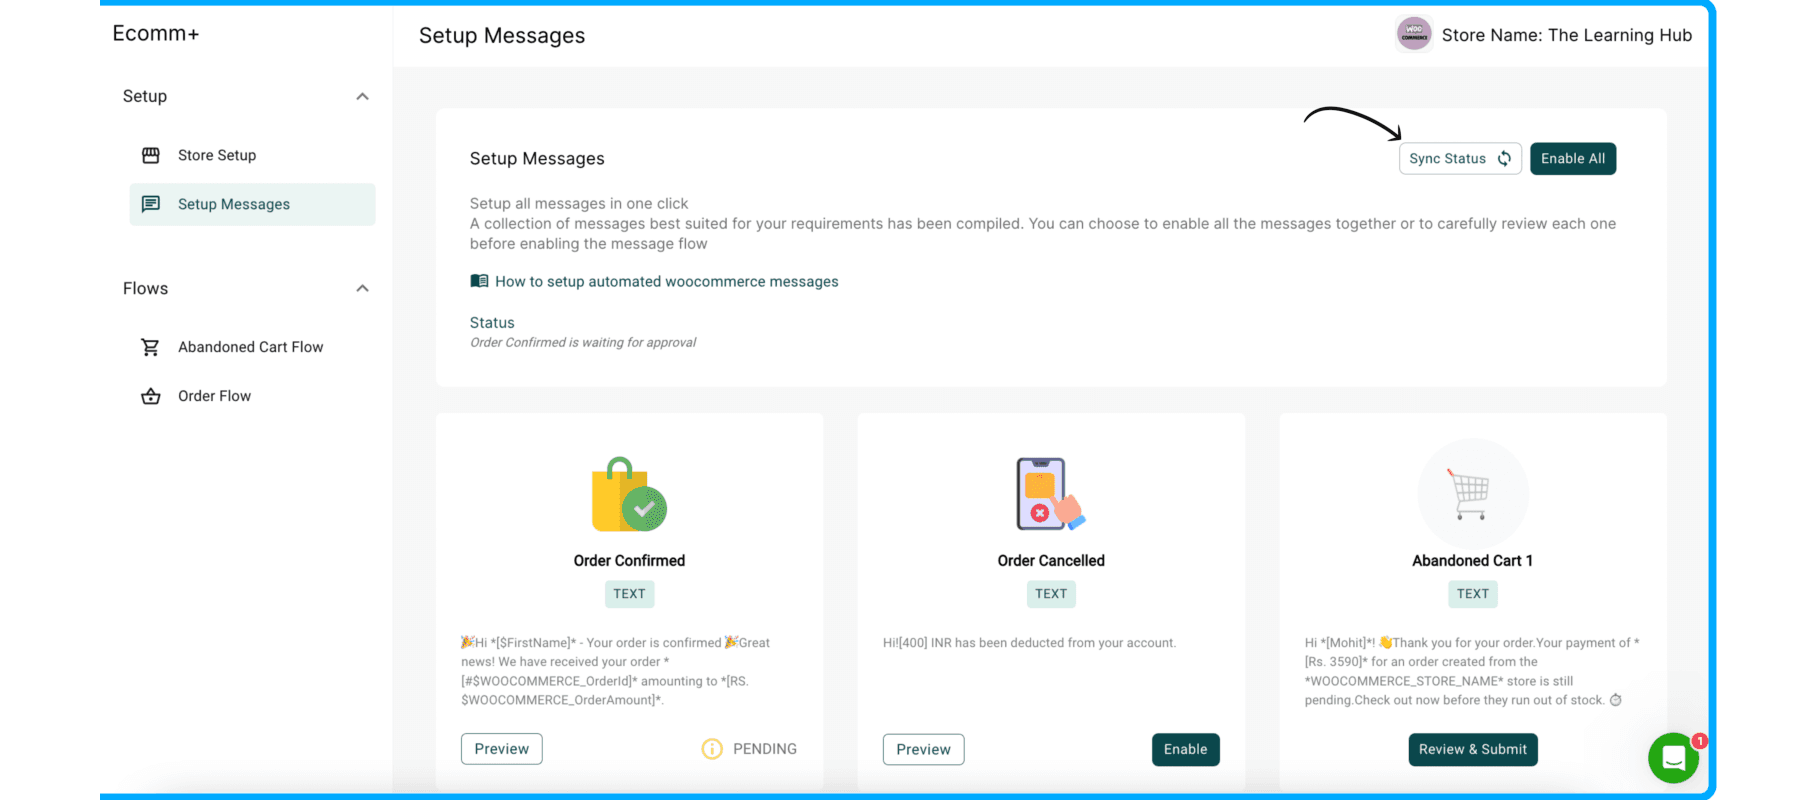
7. Sync status to view the approval status of your Templates
The messages you submit will go under the Pending status & in most cases get approved instantly. In some cases, it might take 15 minutes - 3 hours.
Refresh the app to view the approval status.
You can view the messages pending approval below the status section.
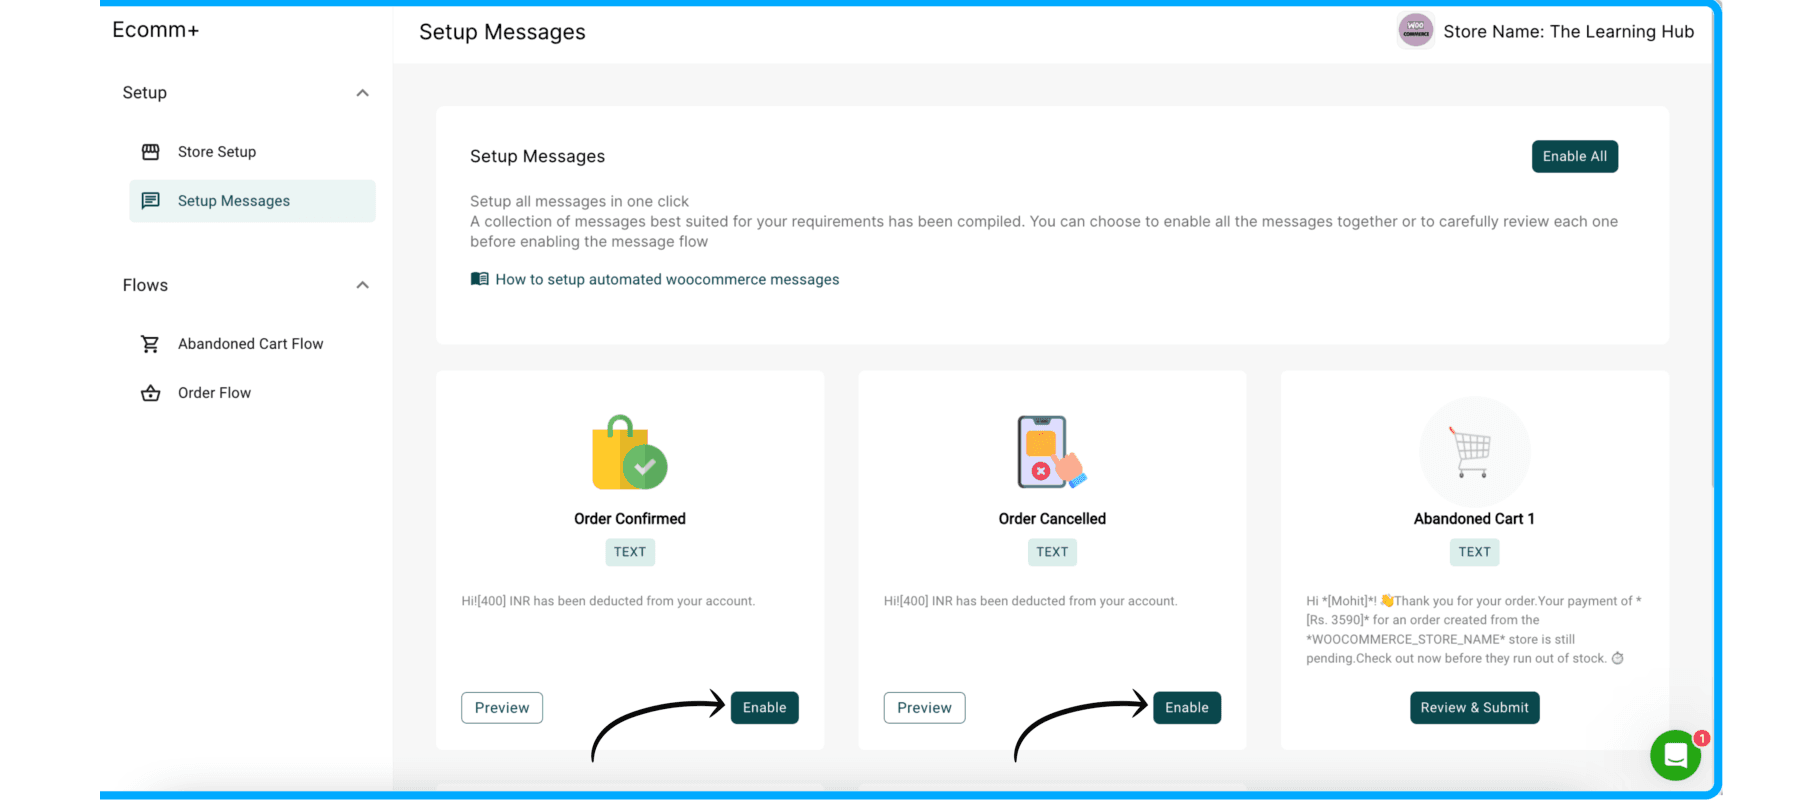
8. Enable approved templates
Once the messages get approved, you'll need to Enable them to start your WooCommerce messaging flow.
In case the messages get rejected, you'll need to re-submit them for approval.
9. Message Flow enabled
Once you enable your message templates, the message flows will go live.
This means that if a user initiates an action on your WooCommerce store, e.g. let's suppose a user adds your product to the cart but does not purchase. Since your Abandoned Cart flow is live, the user will receive an Abandoned Cart reminder notification on WhatsApp motivating them to complete their purchase.
To enable Abandoned Cart Flow, you also need to setup Cart Abandonment in your WooCommerce store.
Follow these steps to setup Cart Abandonment for WooCommerce

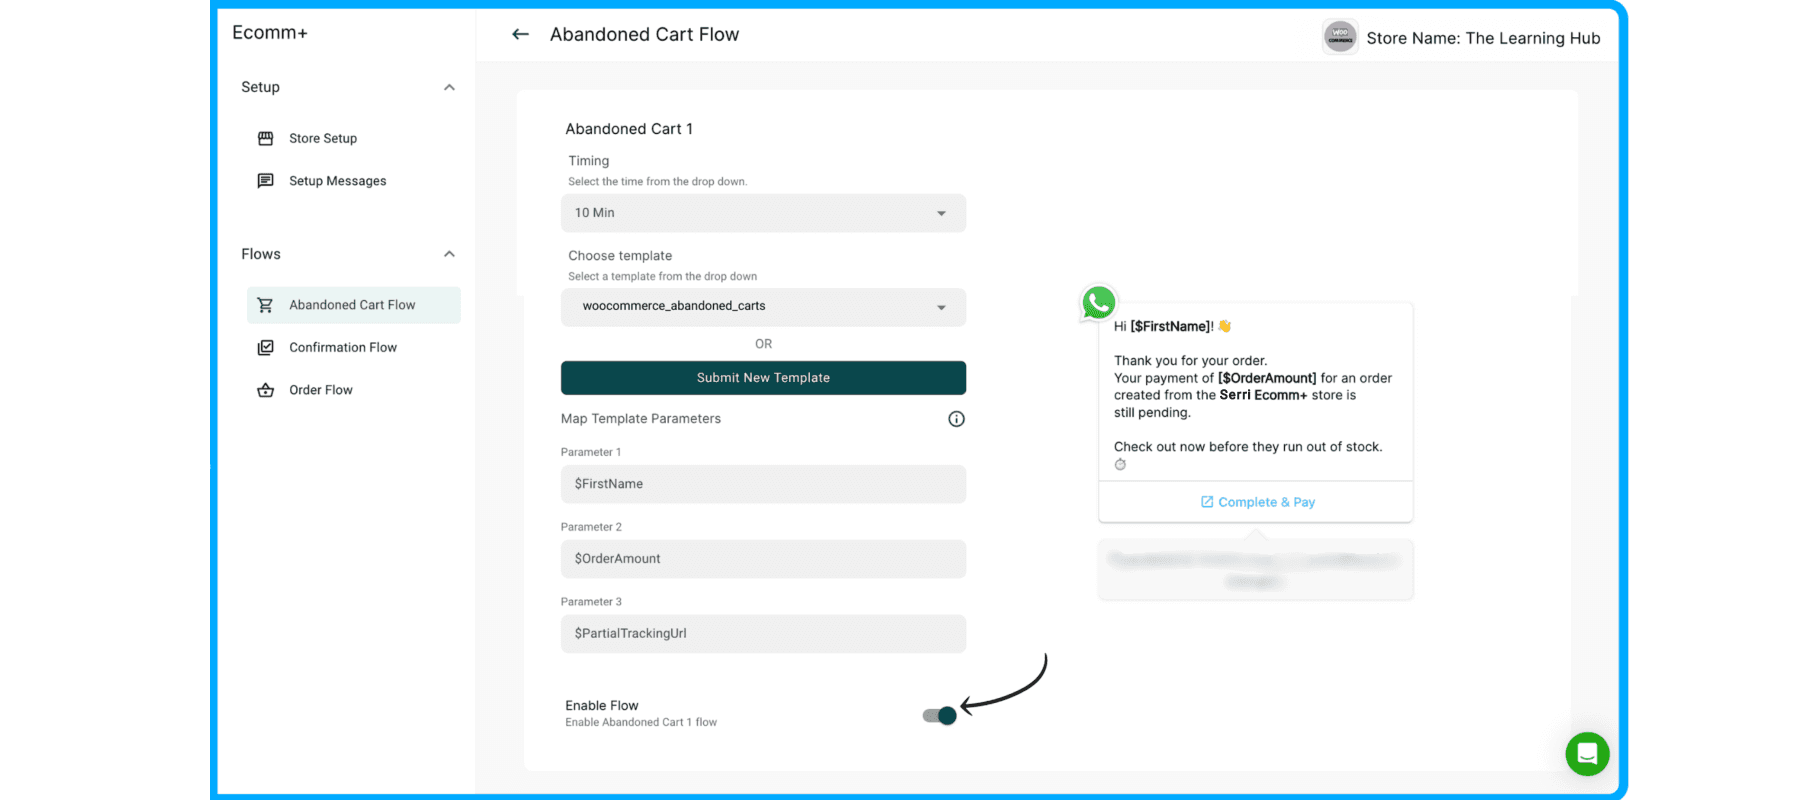
10. Edit the template, if necessary
Now, let's say you wish to edit your messaging flow. You can do this easily by clicking the pencil icon & making the necessary changes.
11. After final edits, enable the flow
Once you make the final edits, Enable the flow once again.
Congratulations!!🎉
Your WooCommerce flow is ready & enabled.
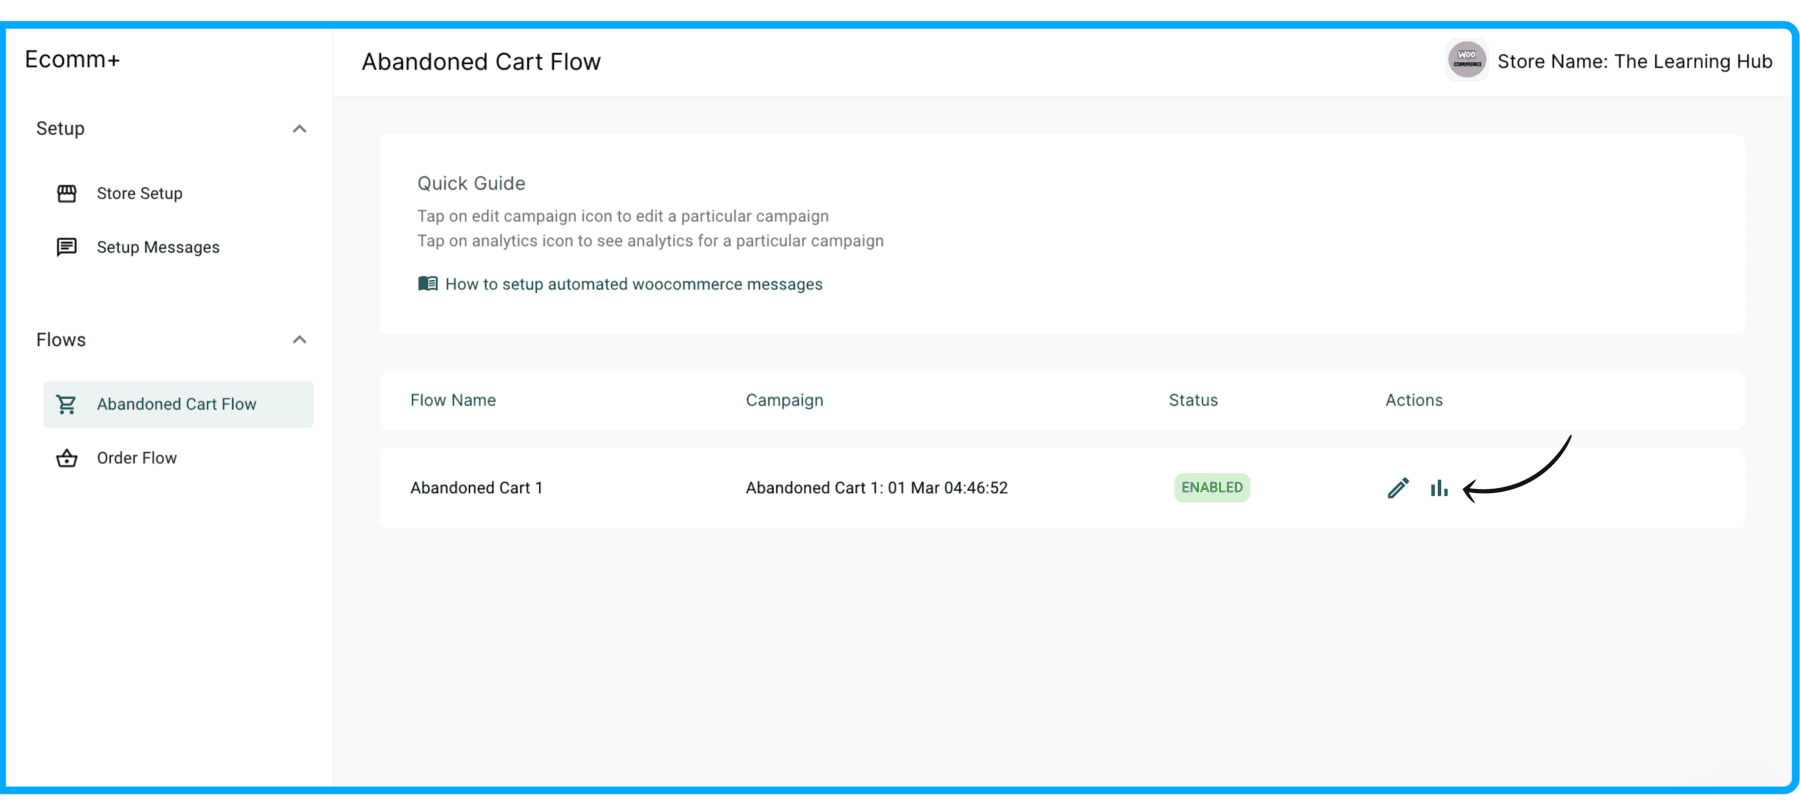
12. Click the Graph icon to monitor analytics
To track your message analytics, click the Graph icon as shown in the image below.
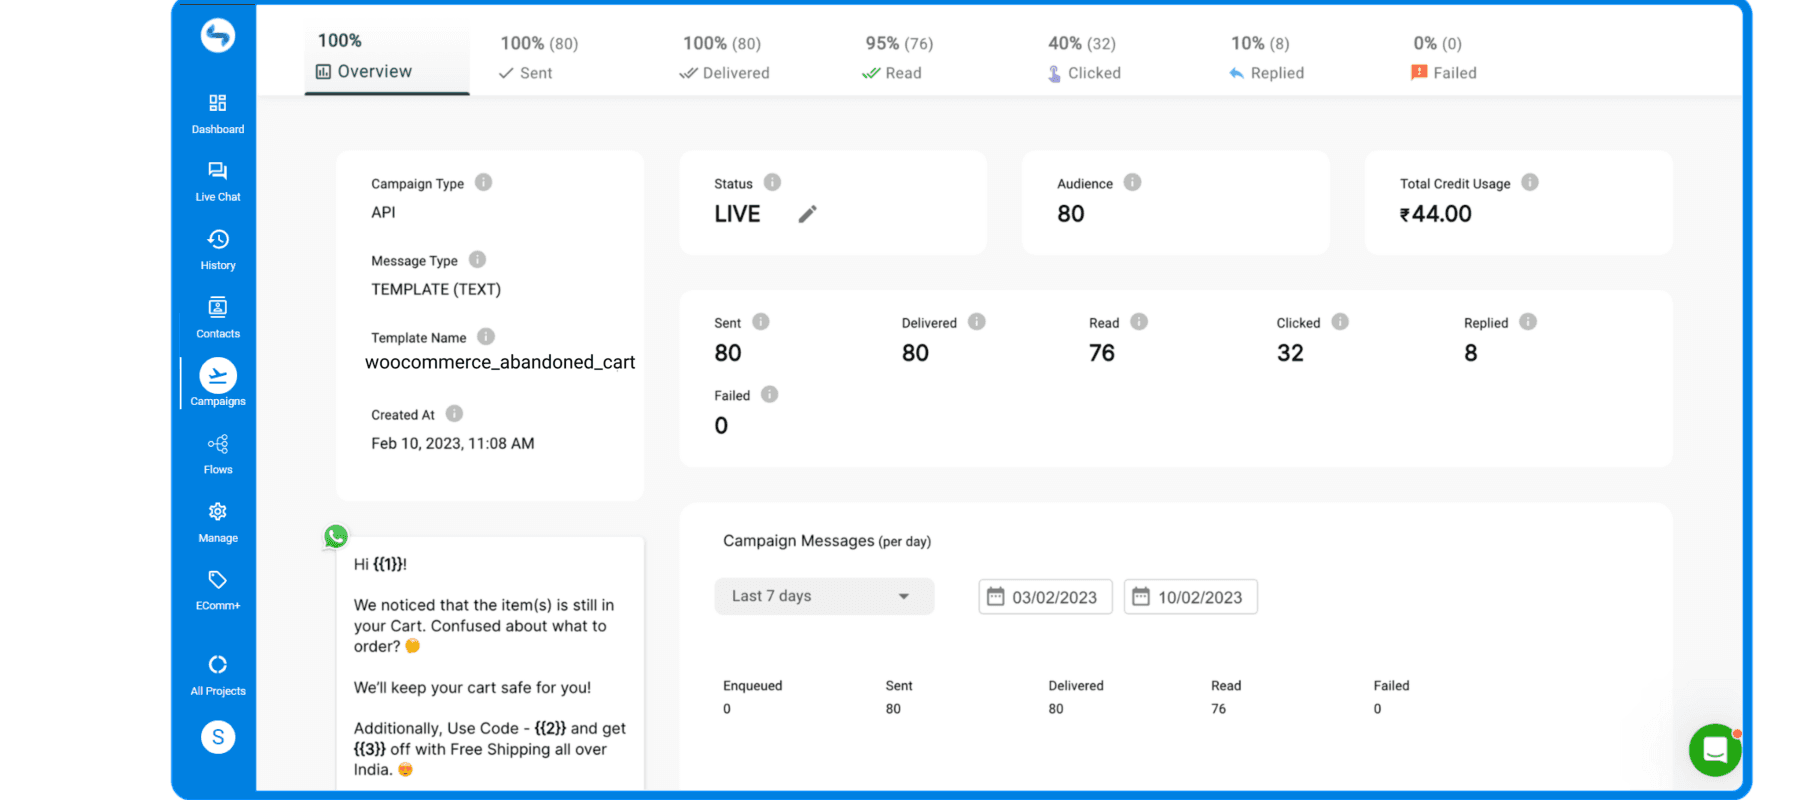
13. Monitor Campaign Analytics
Clicking the graph icon will take you to the Campaigns page where you can monitor the analytics for the particular campaign.
You can also retarget these users based on whether the message was Sent, Delivered, Read, Clicked, Replied or Failed.
How to set up Cart Abandonment flow in your WooCommerce store?
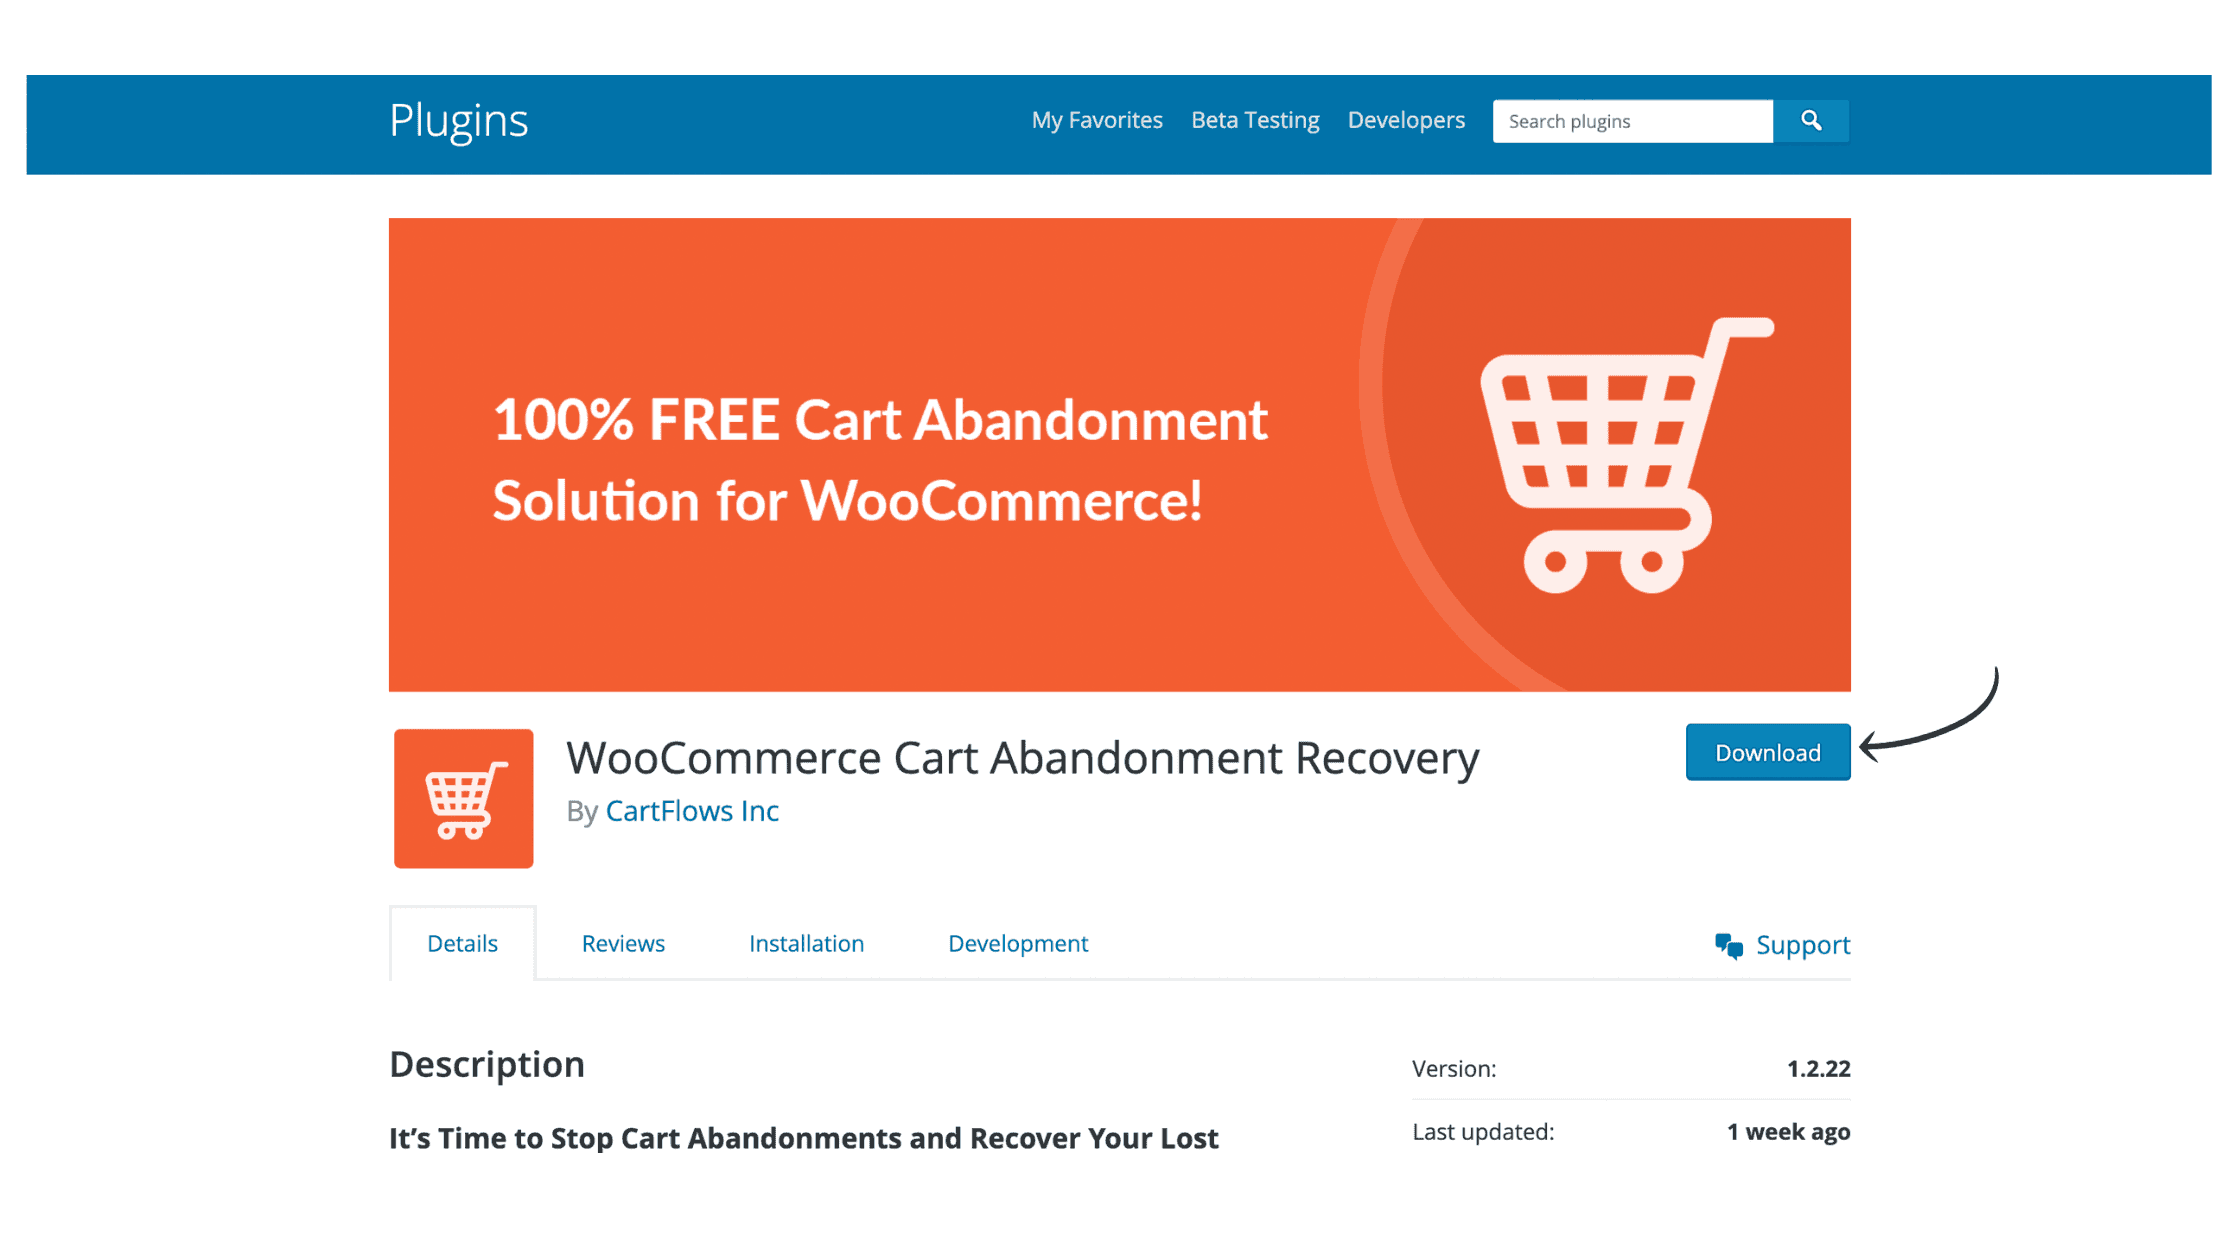
1. Download the WooCommerce Cart Abandonment Recovery Plugin
Download the WooCommerce Abandonment Recovery Plugin by clicking this link - https://wordpress.org/plugins/woo-cart-abandonment-recovery/
2. Copy the WooCommerce Webhook URL from Serri
Now, login to your Serri Dashboard 👉 Go to Ecomm+ 👉 Copy the Webhook code.
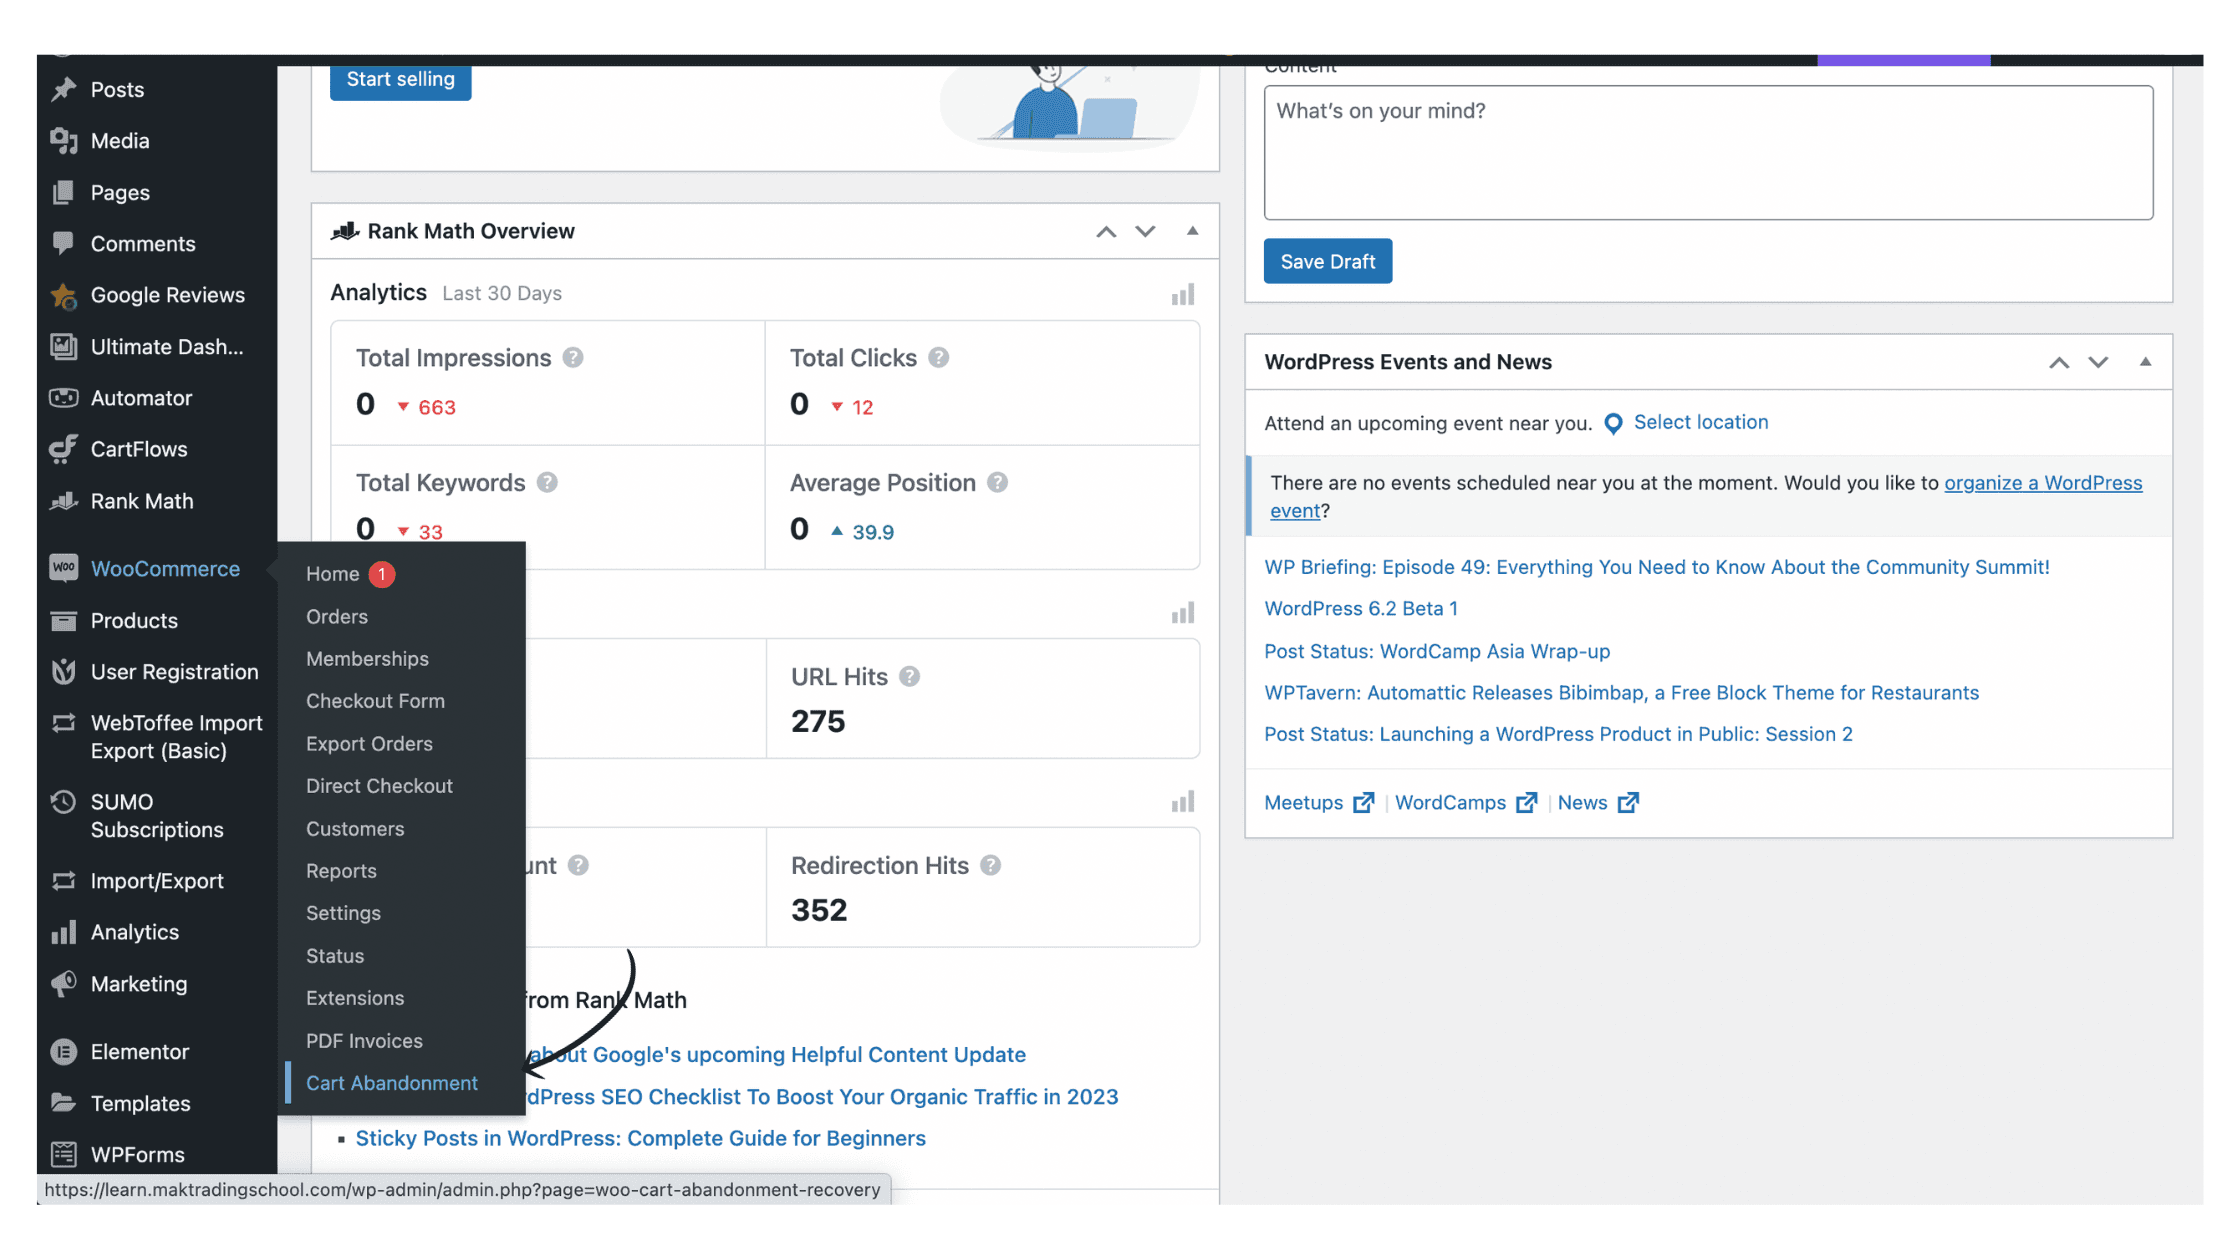
3. In WooCommerce Dashboard, go to Cart Abandonment
Hover above the WooCommerce section & click on Cart Abandonment.
Note: If you don't see Cart Abandonment, try to reinstall the plugin.
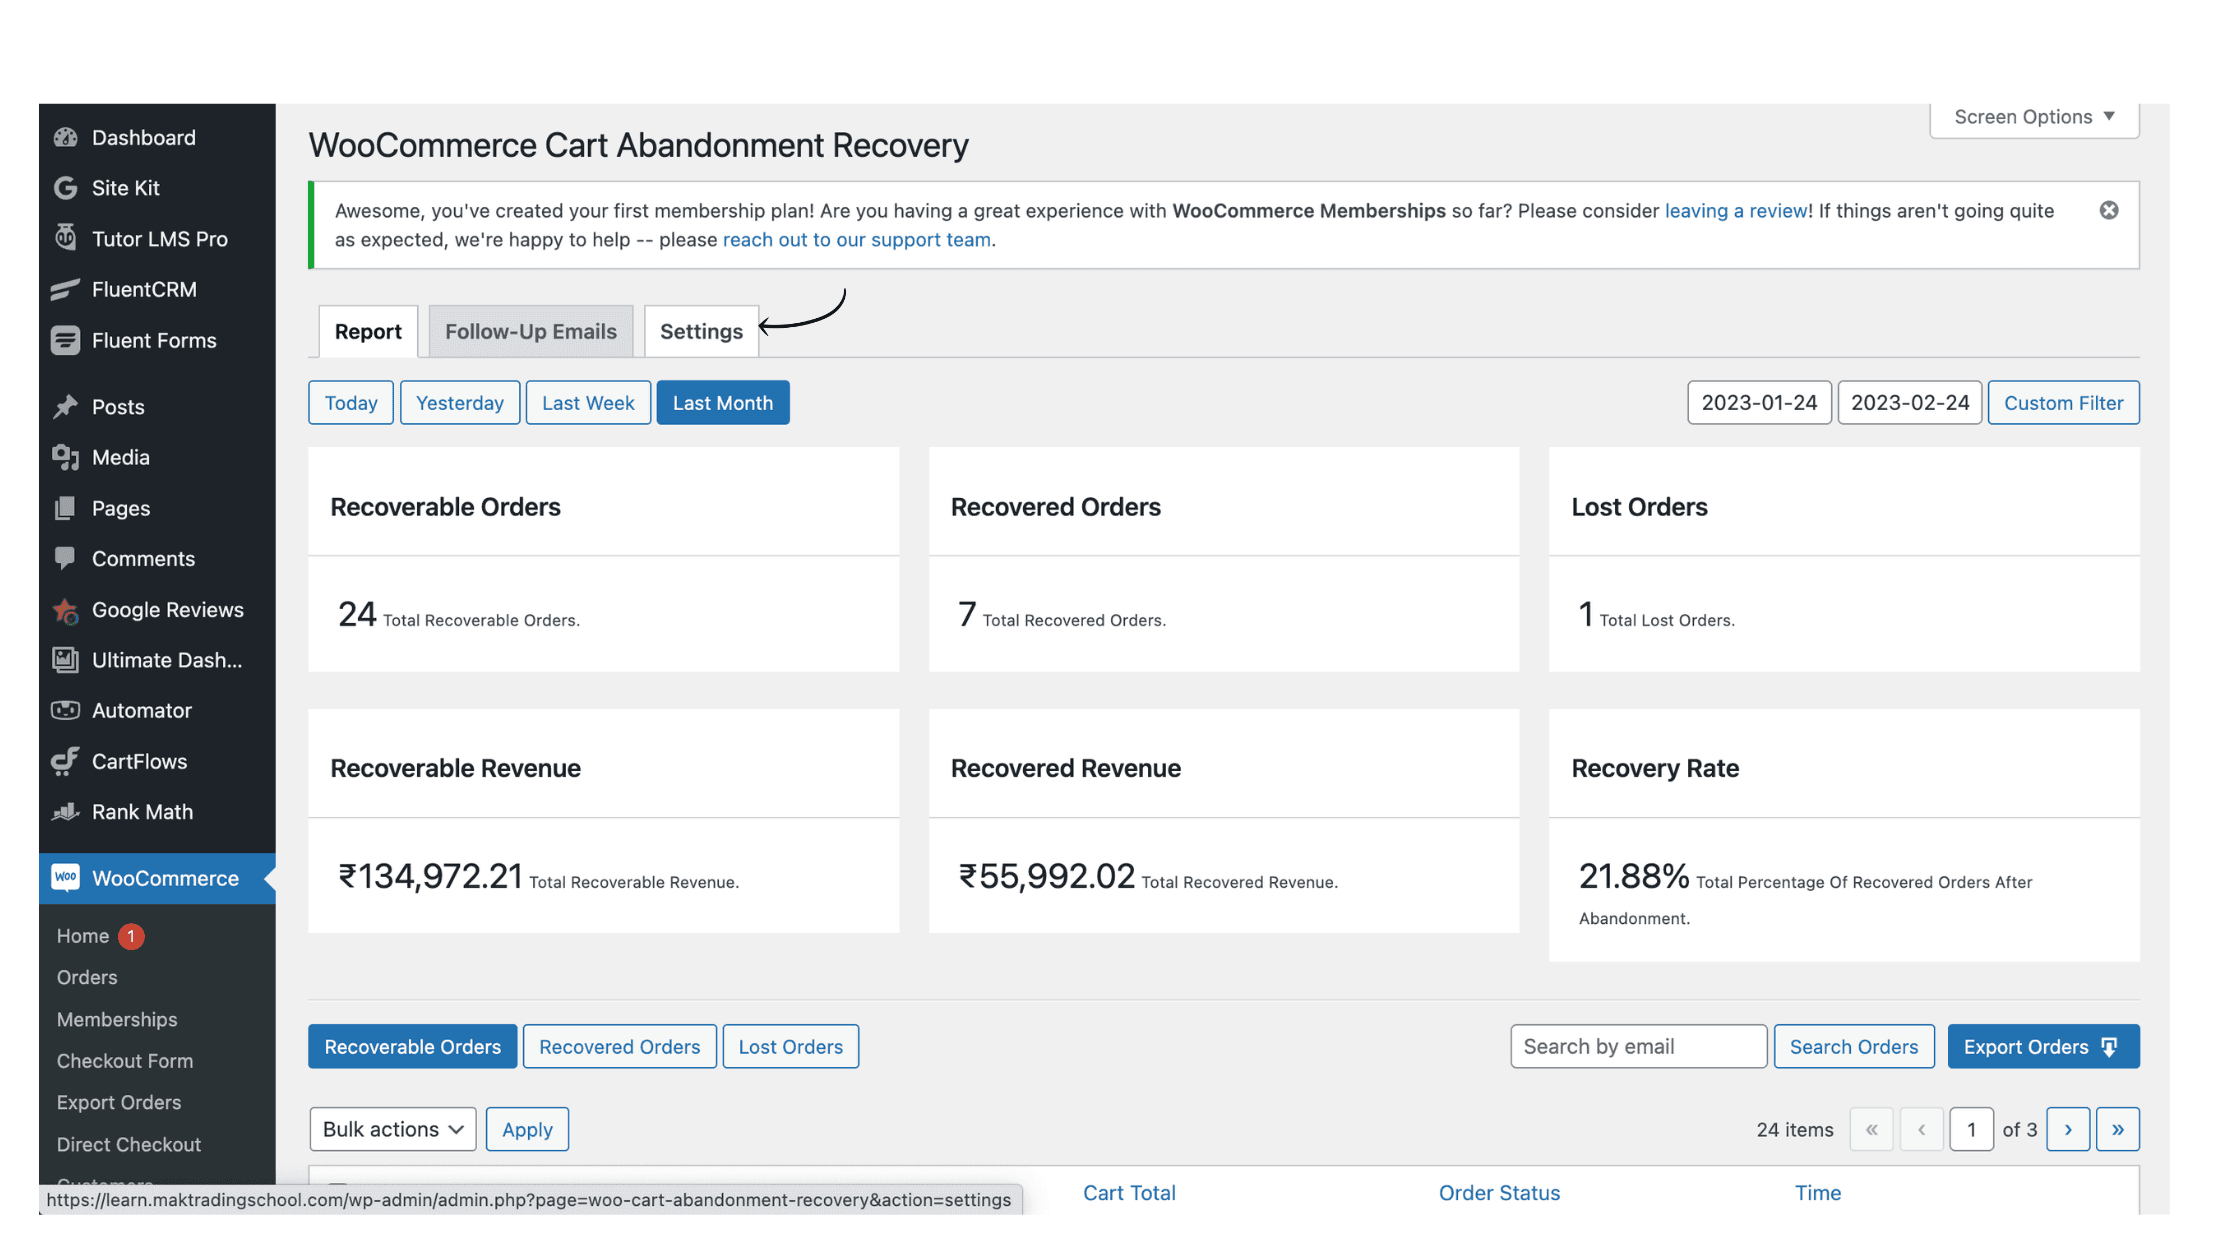
4. Go to Settings
Next, go to Settings inside your WooCommerce store.
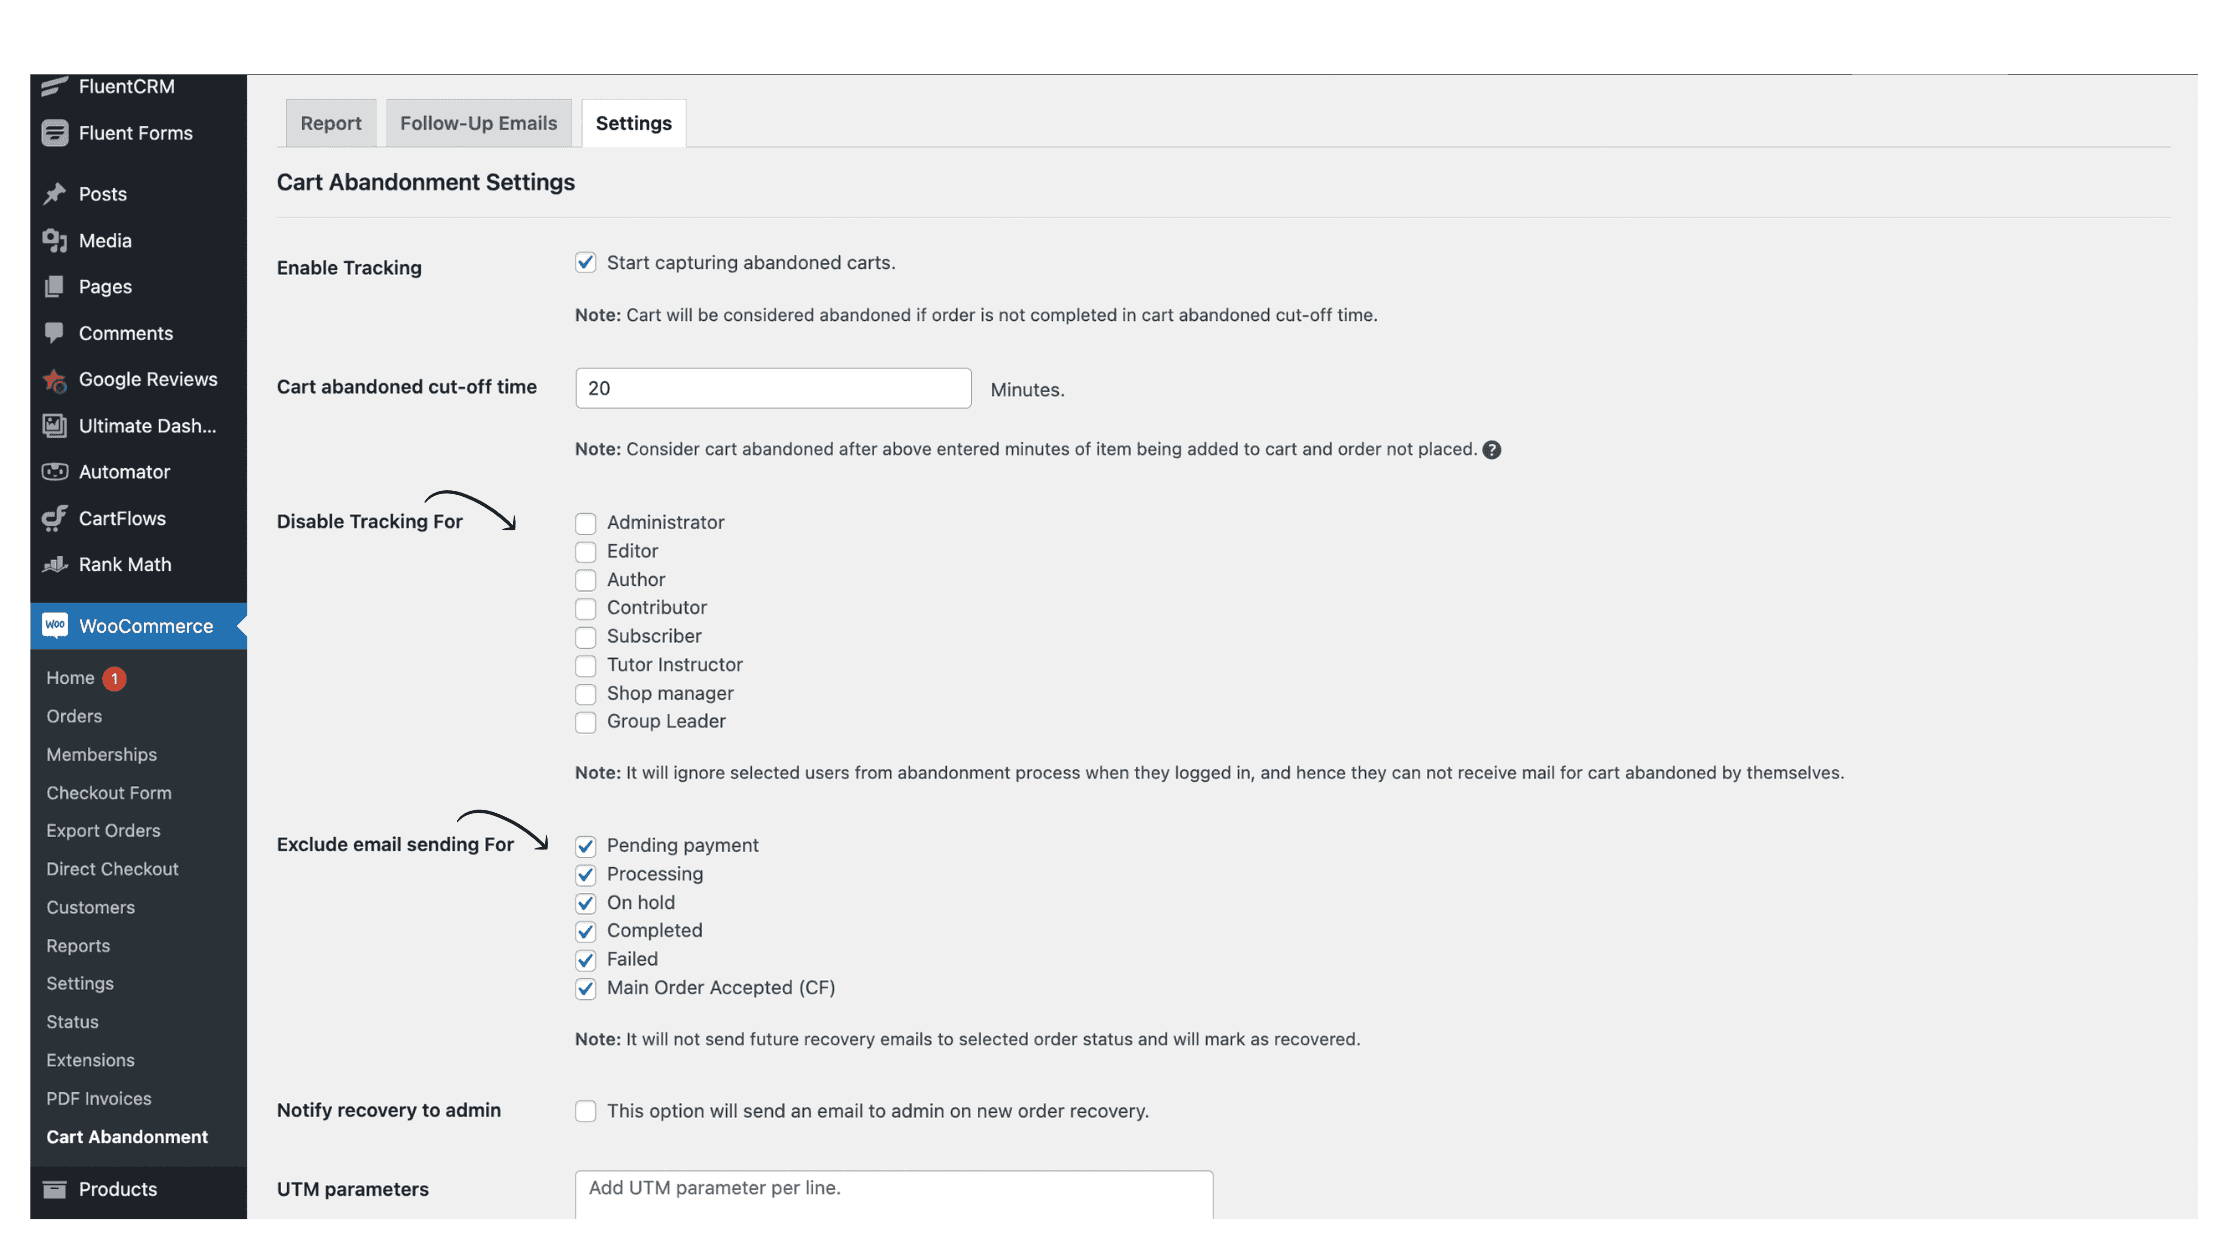
5. Disable Tracking & Exclude Email sending as shown in the image
In the settings section, untick all the options under Disable Tracking for section & enable all of the options under Exclude email sending for section.
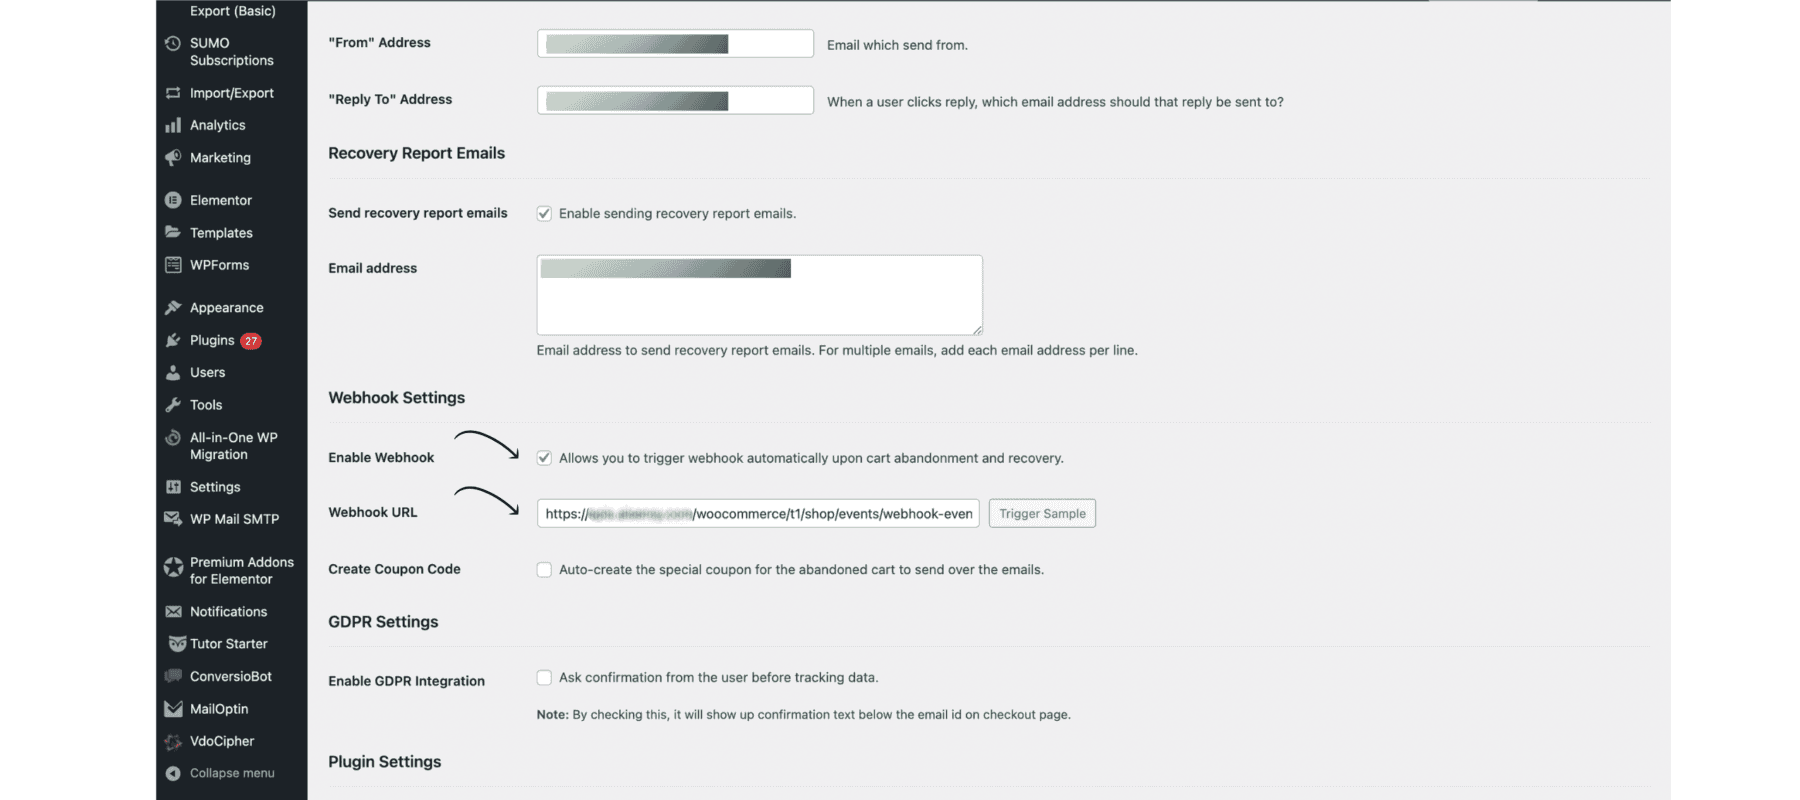
6. Paste the Webhook URL
Next, scroll down 👉 enable the Webhook 👉 Paste the Webhook URL you copied from Serri Dashboard.
7. Save Changes. That's it!
Save the final changes. That's it! Your WooCommerce Abandoned Cart flow is all set.
Now, whenever a user adds your product to their cart but doesn't purchase, they'll receive a WhatsApp message motivating them to check out their cart item.

WooCommerce Exclusive Serri Attributes
Here are the Exclusive WooCommerce attributes you'll find in Serri .
1. $WOOCOMMERCE_Email
This attribute captures a user's Email. E.g. shivam@gmail.com.
2. $WOOCOMMERCE_OrderId
This attribute captures the unique Order Id of a new order placed by the user.
3. $WOOCOMMERCE_LineItems
This attribute captures the list of items purchased (If multiple products are purchased) with comma separation. E.g. Soap, Bodywash, Toothpaste etc.
4. $WOOCOMMERCE_OrderAmount
This attribute captures the amount paid by the user for an order.
5. $WOOCOMMERCE_OrderStatus
This attribute captures the order status, meaning whether the order is confirmed, delivered, refunded etc.
6. $WOOCOMMERCE_OrderDate
This attribute captures the date & time on which the order was created by the user.
7. $WOOCOMMERCE_PaymentMethod
This attribute captures the mode of payment of the user, meaning whether the order is COD or prepaid.
8. $WOOCOMMERCE_PartialTrackingLink
This attribute captures the unique pathway of the tracking URL. Combining this with your WooCommerce domain will give you the full tracking URL. E.g. WooCommerce Domain + Partial Tracking URL = Complete Tracking URL
9. WOOCOMMERCE_CheckoutUrl
This attribute captures the complete Abandoned Checkout URL.
10. WOOCOMMERCE_OrderKey
This attribute captures the Order key which acts as a unique identifier.
11. WOOCOMMERCE_CouponCode
This attribute captures the Unique coupon code of an order.
01
Why Choose Serri?

02
How Can Serri Transform My Business?
03
What Do I Need to Get Started with Serri?
04
Getting Started with Serri: How Long Does It Take?
05
What Level of Support Does Serri Offer?
06
How can I get the WhatsApp Business Verified green tick?
07
Can I use my existing WhatsApp number with SerriWAMS?
08
Is Serri Safe for Bulk Messaging?
09
Migrating to Serri: Is It Complicated?
10
Can Serri Assist in Customer Acquisition?
11
Understanding Serri's Payment Terms?
12
Are There Any Hidden Charges with Serri?
13
Interested in Volume Discounts?
